Baked Mini Buttermilk Donuts
-
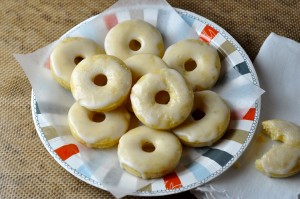 Mini anything is good. Eating something small creates the illusion that you’ll really only consume just a little bit, and you’re allowed to feel like you’ve still been responsible if you only have three of something mini. (Hit the four mark and you’re a total glutton- but three? You’ve simply had a taste.)
When I think of donuts I think of something wonderfully deep fried. The only problem is that ‘wonderful’ and ‘deep fried’ are just a tad oxymoronic, and anyways, we don’t happen to have a deep fryer at home- so these donuts are baked in a mini donut pan (you can get them at any department or kitchen store these days). They are cakey and yet somehow light at the same time… and the simple glaze is an absolute necessity to finish these miniatures off.
(Speaking of glaze- I have inordinately fond memories of sitting in Tim Horton’s once a week as a kid with my Mom, eating their chocolate donut covered in white glaze which was then covered in sweetened coconut [inappropriately and boringly called the “Chocolate White” donut- couldn’t they have done better than that?]. I’d eat the donut slowly and methodically, entering a Tim Horton’s Trance of sorts, wondering how on earth they achieved the right glaze:coconut ratio. Yes, donuts have a special place in my heart. And now I feel the need to re-create the Chocolate White. I might just have to get a deep fryer after all.)
3 cups all-purpose flour
1 cup sugar
2 teaspoons baking powder
1 teaspoon baking soda
1/2 teaspoon salt
1/2 teaspoon ground cinnamon
1/4 teaspoon ground nutmeg
1/4 teaspoon ground cloves (optional)
1 cup buttermilk
3 eggs, lightly beaten
1/2 cup unsalted butter, melted
1/2 teaspoon vanilla
GLAZE:
1 cup confectioner’s sugar
2 tablespoons very hot water
1/2 teaspoon almond extract (optional)
- Preheat oven to 325°, and lightly grease mini donut pan.
- In a medium bowl, combine all dry ingredients (flour through cloves).
- In a separate medium bowl, combine buttermilk, eggs, melted butter and vanilla, and then stir into flour mixture until well combined.
- Fill each donut cup about 3/4 full, and bake for 10 minutes (until donuts spring back lightly when touched). Cool for a few minutes in the pan, then turn out onto a cooling rack.
- GLAZE: in a small bowl, stir sugar with hot water and almond extract (if using). Dip the donuts into the glaze and place on a cooling rack or parchment paper to set.
Tips:
- Temperature matters here… make sure your buttermilk and eggs are room temperature, so the butter doesn’t firm up when stirring together. (I sometimes put the measuring cup with the buttermilk in the microwave for 15 – 20 seconds to take the chill off, and you can let the eggs sit in warmish water for a few minutes before cracking.)
- No buttermilk? Pour almost a cup of milk into a measuring cup, and add a tablespoon of either lemon juice or vinegar to it; stir and let set for 5 minutes. No problem.
- Nice and neat: I poured the batter into a piping bag (a large plastic ziploc bag will do fine with the corner cut off) and piped the donut batter into the pans so they didn’t look like my 3 1/2 year old niece made them.
- Only one donut pan? Me too. I am too impatient to wait for the pan to come out of the oven and refill and do it all over again, so I made just 1 tray of mini donuts and just scooped the rest of the batter into mini muffin tins and baked them a few minutes longer. I might consider buying more pans in the future, but I already have a pan problem at home. The Husband might finally put his foot down.
- Glaze comments: I dip the donuts in while they are still a teeny bit warm, so the icing drips down the sides a bit easier. Add more sugar or water if you like a thicker or thinner glaze. Chocolate glaze sounds tempting, doesn’t it? Go ahead and stir 1/2 cup of melted chocolate chips into the glaze. Voila. Chocolate craving addressed.
- Eat these pronto! They taste freshest the same day they are made. (Why would you want to wait until tomorrow to eat them, I might ask?!)
Related Recipes & Posts:

